18 Eggshell Craft Ideas for Kids
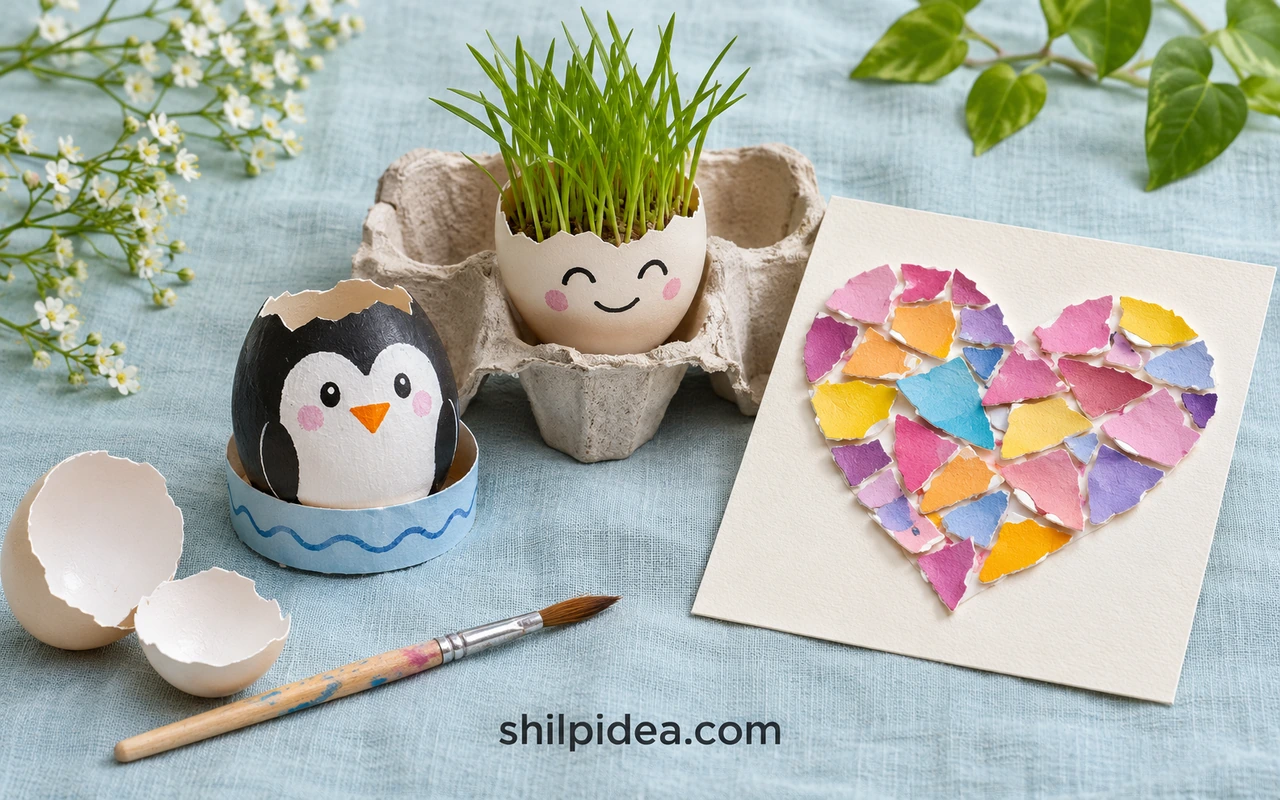
These 18 eggshell crafts for kids range from painted animals and mosaics to sidewalk chalk and miniature displays. Start with shells prepared by an adult and use a tray to keep pieces in one place.
If you already have a carton on hand, try these egg carton crafts or cut a section from a clean carton to make stands for your painted characters.
Pick a project with your child, or draw a simple outline using these animal art patterns. Cardstock pieces make a good swap when shells are unsuitable.
Prepare the Shells Before Crafting

Have an adult prepare the shells away from the craft table. Save shells from cooked eggs for mosaics, rinse away residue and let them dry completely. For a character, use a clean hollow craft shell or a paintable paper egg if you do not have a stable shell. Children can decorate and arrange the materials once the prep is done.
Use a tray, school glue, washable craft paint and sturdy cardstock. Keep sharp fragments and small pieces away from children who put things in their mouths. For a group activity or where egg allergy is a concern, use torn cardstock or paper eggs instead. If raw egg touches hands, tools or work surfaces during kitchen prep, wash them with soap and water. See the FDA egg safety guidance.
1. Painted Penguin

Use a paper ring to steady the egg shape while the paint dries. Start with a white belly, then paint black around it and add two eyes and an orange beak. A cotton or paper backdrop can turn a single penguin into a tiny winter scene. For a different project with reused materials, try these bottle cap crafts. Keep paint layers light so there is less wet paint to smear when you turn the egg.
2. Yellow Chick Pair

Make two chick characters with different expressions. Paint each shell yellow, then draw the eyes and add a folded paper beak if you want a little dimension. Give each chick an individual stand so it can sit upright without leaning against the other. Set the finished pair on a cardboard strip and let children draw a little path or nest around the stands.
3. Grass Hair Shell Planters

Set each prepared shell cup in a stable tray. Add a little seed-starting mix and sow grass seed according to the packet. Put the cups in suitable light and add small amounts of water so the shallow shells do not sit in a puddle. Draw faces below the rim, then observe and sketch how the sprouts change. Treat the shells as a short-term growing activity.
4. Painted Shell Cup Display

The archive photo shows how three colors can make a coordinated set. For a kids’ version, leave each painted shell cup empty and arrange them in paper rings from darkest to lightest. Try a solid color on one cup, dots on the next and stripes on the third. Display the finished cups on a stable tray where they will not roll or get knocked over.
See the original candle photos
These archive photos show the former candle project. The children’s activity above uses empty cups and washable paint.


5. Rabbit Silhouette Mosaic

Draw two simple rabbit silhouettes on firm cardboard. Fill one with white shell pieces and the other with brown pieces, then use a dark paper background to make both shapes stand out. Work on the ears first so the smaller curves stay clear. For a less fiddly version, draw one large rabbit and mark the eye with a pencil after the glue dries.
6. Underwater Fish Mosaic

Draw a fish on blue cardstock, then place colored shell fragments inside the outline. Lay the pieces out dry first so you can choose wider shapes for the body and narrower ones near the fins. Glue one small area at a time. Leave some blue space around the fish, or add a dotted border to make the picture look like an aquarium window.
7. Rainbow Heart Mosaic

Draw a large heart on a stiff card and sort painted shell pieces into a few color piles. Let kids experiment with rows, blocks or a scattered mix before gluing. Start with larger pieces near the middle and use smaller pieces only where they fit easily. A little space between pieces keeps the outline easy to read and gives the finished heart a tiled look.
8. Eggshell Mosaic Picture Frame

A plain frame gives children a border to decorate without having to draw a picture first. Let them line up several shades of prepared shell fragments along one side, then repeat the colors on the other edges. Use a cardboard frame with a photo or drawing behind it so the project stays lightweight. The maker’s guide shows how a crackled eggshell finish looks around a photo.
Make This at Home: Eggshell Mosaic Picture Frame
9. Rainbow Color Sorting Board

Draw wide rainbow bands on sturdy card and put the prepared, painted pieces in separate bowls. Ask children to sort each piece before gluing it down. Start with the widest outer band and leave room for the smaller inner ones. White pieces can make the clouds. Try colorful button art for another way to practice sorting. The maker’s rainbow is a useful reference for keeping the bands separate even when the shell pieces are different shapes.
Make This at Home: Eggshell Rainbow Art Project
10. Hanging Eggshell Flower Vases

Turn two shell halves into a seasonal hanging display with dried flower sprigs. Have an adult prepare the shells, make the holes and secure the string. Children can choose flowers and compare lengths before the shells go on a branch. Keep the display away from doorways where it might swing and drop. The maker’s tutorial shows where the two suspension holes sit and how to balance the shell.
Make This at Home: Hanging Eggshell Flower Vases
11. Pastel Eggshell Sidewalk Chalk

Save several prepared shells for this project. Have an adult grind them and handle the fine powder, while children choose the colors and decide which shapes to draw once the chalk has set. Set the pieces aside to dry fully before testing them outdoors. Use the linked recipe for the proportions and drying method, since the mixture needs to hold its shape when unwrapped.
Make This at Home: Homemade Eggshell Sidewalk Chalk
12. Eggshell Crystal Geodes
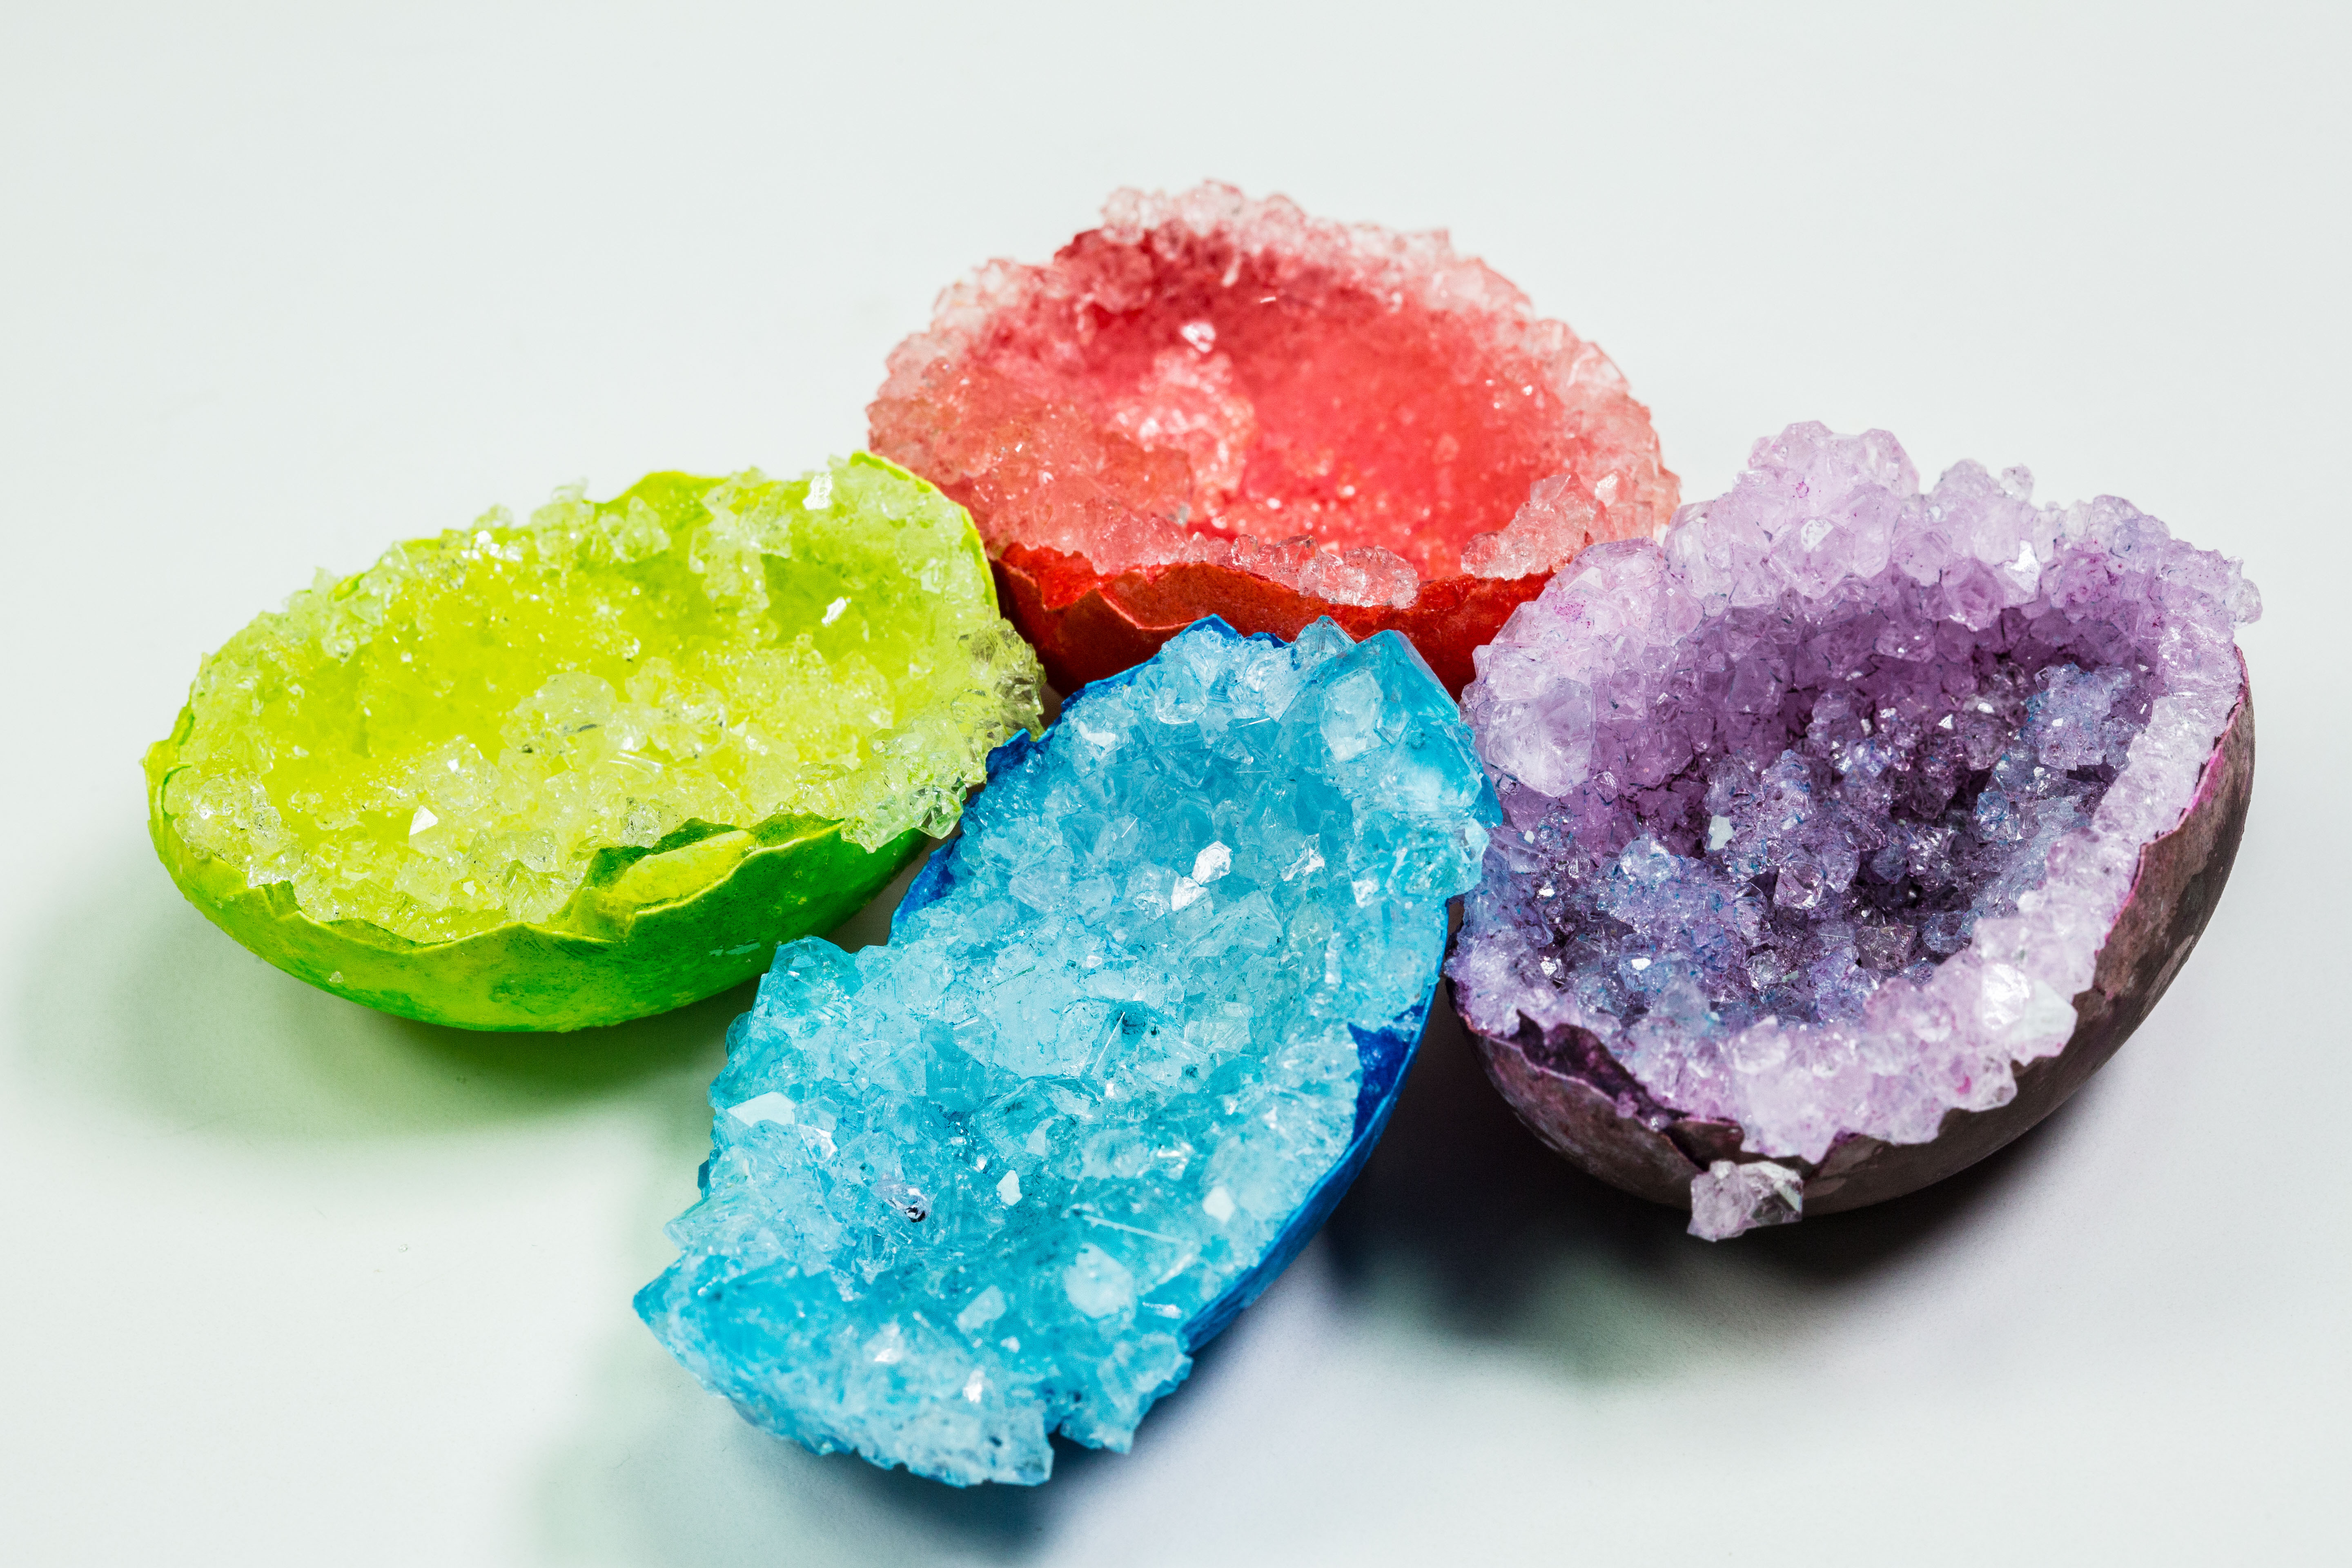
Let children choose a color and predict where the first crystals might appear. An adult should handle the alum, very hot water and pouring, using the protective equipment specified by the science activity. Observe the shells from a distance until everything has cooled. The finished geodes are for display. The research council’s activity explains why crystals grow along the inside and gives the quantities for the adult setup.
Make This at Home: Eggshell Crystal Geode Activity
13. Spring Eggshell Wreath
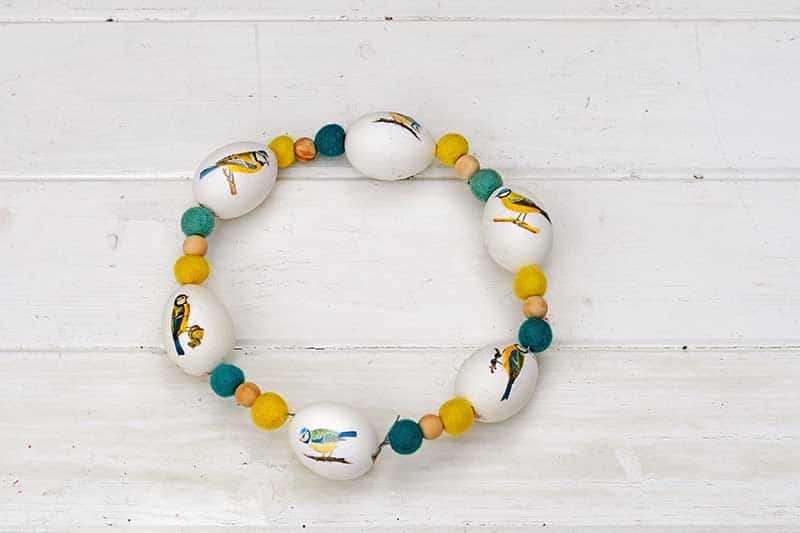
Lay prepared hollow shells beside soft colored spacers and let children try different sequences before the wreath is assembled. Keep any sharp tools, wire ends and shell preparation with an adult. A shallow tray makes it easier to plan the pattern without the shells rolling away. The maker’s project shows how the hollow eggs and spacers sit together and gives an example of a finished ring.
Make This at Home: Real Egg Spring Wreath
14. Paper Confetti Eggs

Cascarones are confetti-filled eggshells. For this supervised version, an adult prepares the hollow shells and kids fill them with paper confetti and choose a tissue-paper color for the opening. Display them in a carton or open one over a tray with adult help so the fragments stay contained. Jennifer’s tutorial shows the filling and tissue seal. A folded paper packet works well when shells are unsuitable.
Make This at Home: Paper Confetti Egg Activity
15. Mini Eggshell Terrarium Scenes

Make a tiny scene inside a prepared shell cup with shredded paper and a paper figure. Pick one theme, such as a spring nest, and leave the opening clear so the scene is easy to see. A small paper ring keeps each shell upright. Use paper cutouts in place of tiny loose toys when needed. Julie’s project shows how to position the scene inside a shell and how it looks on display.
Make This at Home: Mini Eggshell Terrarium Scenes
16. Decorative Mosaic Birdhouse
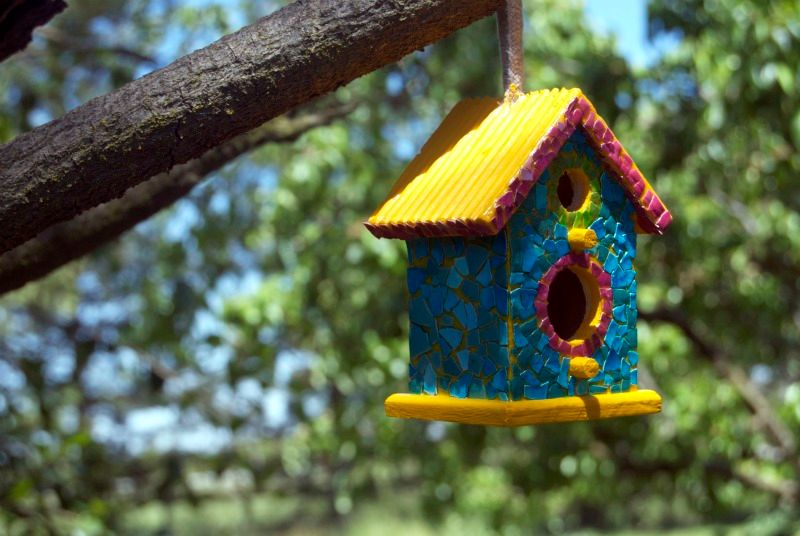
Use a small decorative wooden birdhouse as a canvas for blocks of color. Let children arrange prepared shell pieces for one wall at a time and choose a separate color for the roof. Work on a flat side so the pieces stay put as the glue dries. Display the finished house indoors. Pair it with popsicle stick crafts for a tabletop scene. The maker’s project shows how the mosaic wraps around a three-dimensional surface.
Make This at Home: Eggshell Mosaic Birdhouse Project
17. Napkin Decoupage Eggs
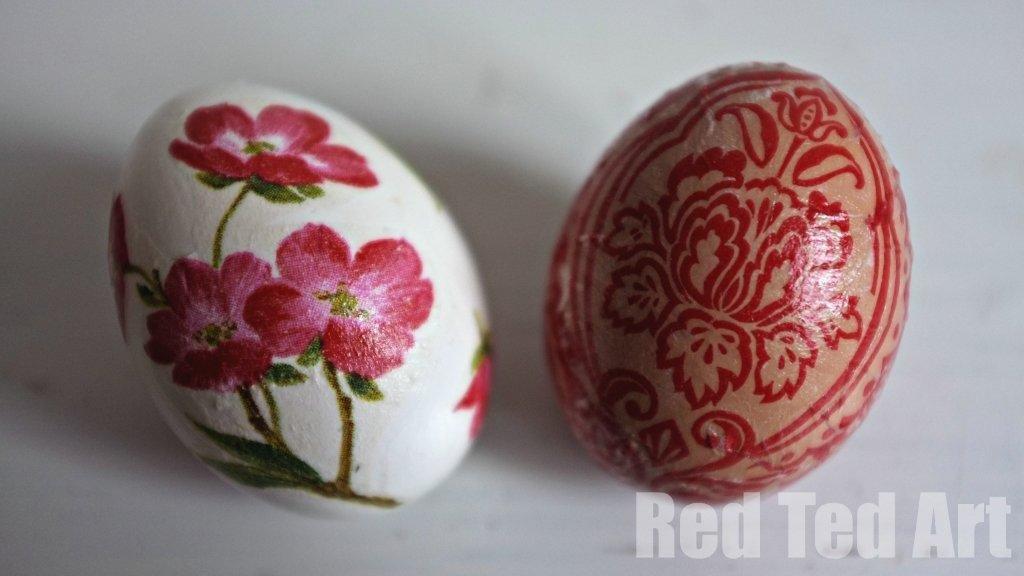
Choose a small motif from a patterned napkin and brush it onto a prepared hollow shell with a suitable water-based craft medium. Work on one side at a time and set the egg in a paper ring while it dries. For an easier version, use a larger paper egg. Maggy’s tutorial shows how thin napkin motifs sit on a curved surface without hiding the whole shell.
Make This at Home: Paper Napkin Decoupage Eggs
18. Eggshell Mosaic Pendant Inspiration

A pendant is a small canvas for older kids who enjoy planning patterns. Compare the photographed silver finish with the colors already used in your other mosaics, then sketch a jewelry design on paper. Keep the finishing materials and metal findings with an adult. The maker’s project is a reference for how a textured surface can look on a wearable piece.
See the Maker’s Project: Eggshell Mosaic Pendant Project
Keep Eggshell Artwork Intact
Let paint dry before gluing pieces down. If a fragment pops off, add a small dab of school glue under it and dry the artwork flat. Use stiff cardboard behind a mosaic if the base starts to curl. Display dried art somewhere away from splashes and keep the grass cups on a separate tray.
More Crafts from Everyday Materials
Once kids have tried painting a shell or filling a mosaic outline, build on the part they liked. A character can lead to a paper animal, and a mosaic can turn into a color-sorting activity with scraps. These projects use familiar shapes and materials, so you can start with what you already have at home.
- Egg Carton Crafts for Kids
- Animal and Nature Art Patterns
- Colorful Button Crafts for Kids
- Popsicle Stick Crafts to Display
- Bottle Cap Toys and Crafts
Which project would your child pick first? Tell us in the comments what colors or patterns you tried. If you made a paper version, we’d love to hear how it turned out.





















0 Comments